MOULDING SAND
The special type of sand is used for making mould. Moulding sand essentially contains the following three constituents.
1. Refractory sand
2. Binder
3. Additive.
These types of sand are used in moulding for the following reasons.
1. It maintains shape at very high temperature.
2. It makes a mould porous.
3. It can be used again and again.
4. It is inexpensive.
1. Constituents of Moulding Sand
Moulding sand has three constituents. They are:
1. Sand
2. Binder
3. Additive.
1. Sand:
Silica sand is widely used as moulding sand. Silica has 80 to 90% silicon dioxide. Silica gives refractoriness to the sand.
Advantages:
(i) It is cheap and easily available.
(ii) It can easily be moulded and reusable.
(iii) It has high thermal stability.
Silica sand is the main constituent of the moulding sand. According to the clay content, the moulding sand is classified into the following types:
(a) Silica sand-up to 2% clay
(b) Lean or weak sand -2 to 10% clay
(c) Moderately strong sand - 10% to 20% clay
(d) Strong sand - up to 30% clay
(e) Loam sand – up to 50% clay
There are the following three main types of moulding sands available.
(a) Natural sand:
As the name implies, it is available from natural deposits. It needs only 5 to 8% water. These sands are available at riverbeds and it contains 80 to 90% of silica, 5 to 10% Alumina or clay and small percentage of lime and magnesia.
Natural sand is also prepared by crushing and milling the soft yellow sand stone. This sand has less refractoriness as compared to synthetic sand. This sand is generally used for making light castings in ferrous and non-ferrous metals.
Advantages:
1. It is cheap and easily available.
2. It is easy to repair.
3. Wide range of grain sizes and shapes are available.
Limitations:
1. It has less refractoriness.
2. It has high expansion ratio.
3. It may be fused with metals.
(b) Synthetic sand:
The moulding sand prepared artificially by mixing clay free sand having the specified grain type with a specified type of clay binder as well as water and other additives. This sand is prepared with the desired properties as required. Synthetic sand is used in both mechanized production machine moulding and high-pressure moulding.
Advantages:
1. It has more uniform grain size.
2. The required properties can be obtained.
3. It has higher refractoriness.
4. It can be easily mouldable.
Limitation:
It is more expensive.
(c) Special sands:
Special sand is prepared for obtaining specific properties such as refractoriness, high heat conductivity and low expansion ratio. It is also prepared for applying in a particular place of mould. Using special sand, good quality casting with fine surface finish can be produced. The following are most often used special sands.
(i) Zircon sand (Zr Si O4):
It is mainly used for making cores of brass and bronze castings. It is also used as a facing sand. It does not react with the moulding sand. It is fine sand having good refractoriness and high density.
(ii) Chromite sand:
It is used for making chilled castings. It may be used as facing sand in steel casting. It has good refractoriness, high heat conductivity and low expansion ratio.
2. Binder:
Binders are used to bring the property of cohesiveness to the sand. They bind the sand grains together and give the strength to the moulding sand.
There are basically two types of blinders used.
1. Organic binder
2. Inorganic binder.
(a) Organic binders:
Organic binders are mainly used for core making. They are cereal, resins, pitch, drying oils, molasses etc.
(b) Inorganic binders:
Clay binders are the most common type of inorganic binder. It is a natural earthy material. Clay is formed by weathering and decomposition of rocks. The common types of clay used in moulding sand are: (i) Fire clay, (ii) Kaolinite nd (iii) Bentonite. Kaolinite and Bentonite clays are the most popular clays because they have high thermochemical stability. Portland cement and sodium silicate are also used as binders.
3. Additives:
Additives are added to the moulding sand to improve the properties such as strength, refractoriness and permeability. These additives may be necessary to give a good surface finish to the casting or to eliminate the casting defects that arise from either the expansion of the moulding sand or contraction of the casting. Additives are not used for binding purpose. Some common additives used to improve the properties of moulding sand are given below.
(i) Sea coal:
Sea coal is finely powdered bituminous coal. It is used to obtain smoother and cleaner surfaces of castings and it also reduces the adherence of sand particle to the casting. It is mainly used to make ferrous castings. It is added up to 8%. When the molten metal is poured into the mould, coal dust burns and gives off volatile substances such as CO2 and CO which form gas spacing between mould walls and metals. It improves the permeability of moulding sand.
(ii) Saw dust:
It improves the permeability and deformability of the moulds. It should be dry. Otherwise, peat which contains about 70-73% volatile matter should be used
(iii) Pitch:
It is distilled from soft coal. It improves hot strength. It gives fine surface finish for ferrous castings.
(iv) Cereals:
It is finely ground corn flour or cornstarch. It increases both green strength and dry strength of the moulding sand. Generally, it is used about 1%.
(v) Silica flour:
It is very fine powdered silica. It is generally mixed twice the moulding sand to make facing sand and used around the pattern. Therefore, it improves the surface finish of the casting. It also increases hot strength and reduces sand expansion defects.
(vi) Special additives:
Fuel oil, dextrin, molasses and iron oxide are also added to moulding sand. Fuel oil improves the mouldability of sand. Dextrin increases both collapsibility and setting strength. Molasses improves the dry strength and collapsibility of the mould. Iron oxide improves the hot strength of the moulding sand.
2. Types of Moulding Sand
Various types of moulding sand used in moulding are:
1. Green sand
2. Dry sand
3. Facing sand
4. Loam sand
5. Backing sand
6. Parting sand.
1. Green sand:
The sand which is in moist state is known as green sand. It contains 5 to 8% of water and 16 to 30% of clay. It can retain any shape and has good damping capacity. It is soft, light and porous. It is used for simple, small and medium size castings. The mould made out of this sand is called green sand mould.
2. Dry sand:
The moulding sand is prepared in dry stage. If the mould is formed by the dry sand, then it is called dry sand mould. Dry sand is used for making large castings. This mould does not cause defects due to moisture. This mould has greater strength and rigidity. If the portion around the cavity only dries, it is called skin dry mould.
3. Facing sand:
Mostly, the facing sand is used directly to cover the surface of the pattern and comes in contact with molten metal (i.e. Facing sand forms the face of the mould). It contains silica, clay, talc, graphite, plumbago, molasses etc. Facing sand must have high refractoriness and strength.
4. Loam sand:
Loam sand consists of fine silica sand, fine refractories, clay, graphite, fibre and water. It contains as much as clay around 50%. Loam sand becomes hard when it is dried. It is used for melting large castings such as bell, roller, pulleys etc.
5. Backing sand:
The sand which is used to back-up the facing sand and to fill the whole volume of the mould box is called backing sand. The old sand may be repeatedly used for this purpose.
6. Parting sand:
Parting sand is usually applied when a casting is made up of two halves with cope and drag. To avoid the sticking of cope and drag, the parting sand is sprinkled over the parting surface of cope and drag. The parting sand is mixture of silica sand and brick powder. It is also sprinkled over the pattern to avoid sticking of green sand with the pattern.
3. Properties of Moulding Sand
A good casting can be produced only with the use of good quality moulding sand. For this, the moulding properties of the sand have to be controlled.
These properties are:
1. Porosity or permeability
2. Plasticity or flowability
3. Adhesiveness
4. Strength or cohesiveness
5. Refractoriness
6. Collapsibility
1. Porosity or permeability:
Permeability is a measure of moulding sand by which the sand allows the steam and gases to pass through it. When molten metal is poured into the mould, steam and gases are formed due to moisture, binder and additives present in the sand. If the gases are not removed, casting defects such as blowholes will occur. Even though vent holes and riser are provided, all of these gases will not escape through it. To escape the remaining gases, the moulding sand should have good gas permeability. Sand with coarse grains exhibit more permeability. In the absence of permeability, the defects such as surface blows, gas holes, etc. may be experienced.
The permeability of the moulding sand depends on the following factors:-
(a) Quality and quantity of clays and quartz
(b) Moisture content
(c) Degree of compactness.
The following parameters which affect the permeability of moulding sand:
● If the clay content is less, the permeability will be more and vice versa.
● If the grain size is larger, the permeability will be more and vice versa.
● Soft ramming (i.e. less density) improves the permeability.
● Higher is the silica content on sand, lower will be the permeability.
2. Plasticity or flowability:
It is ability of moulding sand to get compacted to a uniform density. Flowability assists the moulding sand to flow and pack all around the pattern and take up the required shape. Thus, it gives the shape of the pattern and retains the shape after removing the pattern. This property may be improved by adding clay and water to silica sand.
3. Adhesiveness:
This is the property of moulding sand by which it sticks or adheres to another body. The moulding sand should cling or stick to the sides of the moulding boxes. So, it does not fall out when the flasks are lifted and turned over. This property depends on the type and amount of binder used in the sand mix. Addition of clay and moisture increases the adhesiveness.
4. Strength or cohesiveness:
It is the property of moulding sand by which it sticks together. A moulding sand should have sufficient strength so that the mould does not collapse or get partially damaged during shifting, turning or pouring the molten metal. Because of pouring the molten metal into the mould cavity, its bottom and walls are subjected to high pressure.
The strength of the moulding sand depends on the following factors:
(a) Grain size and shape
(b) Moisture content
(c) Density of sand after ramming
Strength is increased with increase in density, clay content and decreased size of sand grains. Therefore, as the strength of the moulding sand increases, its porosity is decreased.
5. Refractoriness:
This is the property of moulding sand to withstand the temperature of the molten metal to be poured so that it does not get cracked and fused with the metal or experience any major physical change. This property mainly depends on the purity of the sand particles and their size. Rough and large grain, and quartz content in moulding sand increase the refractoriness. Poor refractoriness will result the rough surface in casting.
6. Collapsibility:
This is the property of the moulding sand to decrease in volume to some extend under the compressive forces developed by the shrinkage of metal during freezing and subsequent cooling. This property permits the moulding sand to collapse easily after the casting solidifies. If the mould or core does not collapse, it may restrict the free contraction of the solidifying material and causes cracks on the casting. This property depends on the amount of quartz and binders.
4. Moulding Sand Preparation
The moulding sand is prepared by the following steps:
1. Mixing of sand
2. Tempering of sand, and
3. Conditioning of sand.
1. Mixing of sand:
In this step, the sand is mixed with binder, moisture and other additives. When a small quantity of moulding sand is required, the mixing is done by manually using shovels. When large quantity is required, the mixing is done by machine (Muller). Initially, all foreign materials such as nails, fins, hard sand lumps and other iron pieces are removed with the help of magnetic separator and screens. Then sand, clay and additives are mixed in the muller to the required condition. The mixing is continued till uniform distribution of ingredients takes place.
2. Tempering of sand:
The process of spraying and mixing an adequate amount of water with the sand in the muller is called tempering. It should be ensured that water is evenly distributed throughout the sand.
3. Conditioning of sand:
The conditioning process includes the following activities:
(a) Removing foreign materials.
(b) Distributing the binder uniformly.
(c) Controlling the moisture.
(d) Aerating the sand, and
(e) Delivering at proper temperature.
Sand taken out from the muller is aerated using an air blaster to separate sand grains and to increase the flowability of sand.
5. Moulding Tools
The following tools are used in a hand moulding process.
1. Shovel:
It is a steel pan with long wooden handle. It is used to mix and temper the moulding sand with clay, moisture and other additives before pouring into the mould. It is also used for carrying the moulding sand from the sand pit or pile to the moulding box. Nowadays, a cast iron handle is also used.
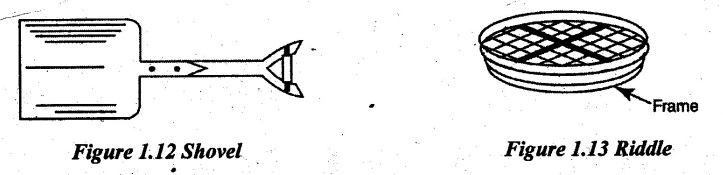
2. Riddle:
Steel wire mesh (screen) fitted into a circular or square frame is called riddle. It is used for removing foreign materials such as stones, nails etc. It is also used to separate various sizes of sand grains.
3. Rammer:
It is used to ram or pack the sand in the box. It is normally made of wood or metal. Rammer has two ends. One end is in wedge shape and it is known as peen end. The other end is in cylindrical shape known as butt end. The peen end may have different shapes.

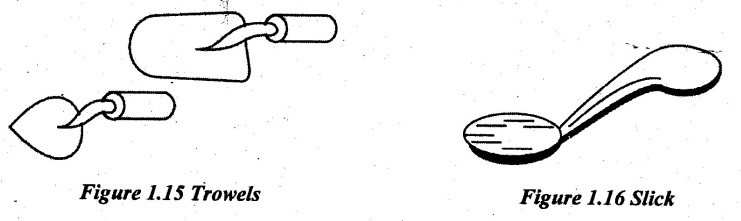
4. Trowel:
It has a metal pan with a short wooden handle. The pan may be in different shapes. It is used to smoothen the surfaces of mould and repair the damaged portions of mould.
5. Slick:
It is a spoon shaped double-ended trowel shown in Figure 1.16. It is used for repairing and finishing small curved or straight surfaces and round corners of the mould.
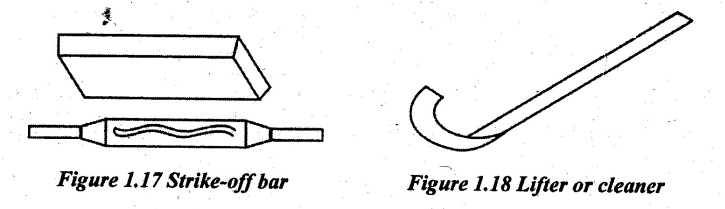
6. Strike-off-bar:
It is made of wood or metal. It has a straight edge. It is used to remove excess sand from the mould after ramming.
7. Lifter:
It is a twisted blade as shown in Figure 1.18. It is used to lift dirt or loose sand from the deep mould. It is also used for repairing and finishing the cavity and gates.
8. Vent wire:
It is a thin steel wire with handle as shown in Figure 1.10. It is used to make small holes on the mould after ramming. These holes permit the gases out when molten metal is poured.
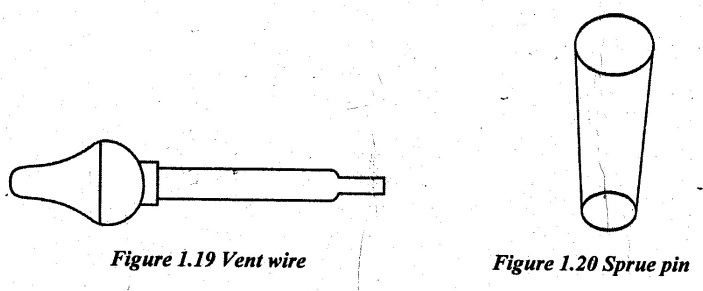
9. Sprue pin:
It is a tapered cylindrical wooden piece as shown in Figure 1.20. It is used to make sprue holes in the cope. The size of the sprue pin depends on the size of the mould. The molten metal passes through this sprue hole to the cavity.
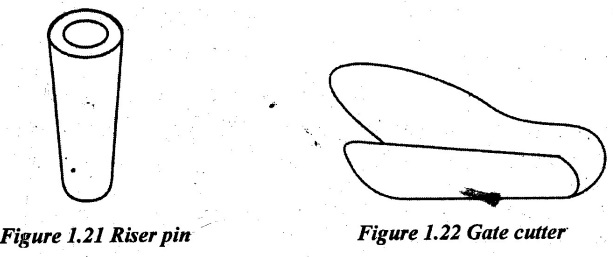
10. Riser pin:
It is also a tapered wooden rod as shown in Figure 1.21. Its size is smaller than the sprue pin. It is used to make a riser in the cope.
11. Gate cutter:
It is a bend type sheet of metal as shown in Figure 1.22 which is used to cut gates. The gate is a passage between mould cavity and runner.
12. Draw spike:
It is a pointed or threaded steel rod with a ring at one end as shown in Figure 1.23. It is used to remove the pattern from the mould.

13. Swab:
It is a small brush. It is used to apply water on the sand around the pattern. It may be used to sweep away the dust from the pattern or excessive sand from mould joint or to give coating on the pattern.
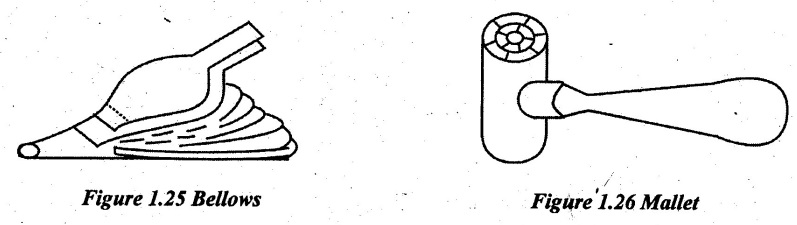
14. Bellows:
Bellows is a device with an air bag that emits a stream of air when squeezed together with two handles. It is used to blow-off loose sand particles from the mould and pattern.
15. Mallet:
It is a wooden hammer which is used to drive the draw spike into the pattern and then lifts from the mould.
16. Moulding boxes:
Moulding box or flask is a frame or box of wood or metal which is used to hold moulding sand. A moulding box may be in two or three parts. The top part is called cope. The middle part is called cheek. The lower part is called drag.
The main types of boxes are
(a) Snap flask
(b) Tight or box flask
(a) Snap flask:
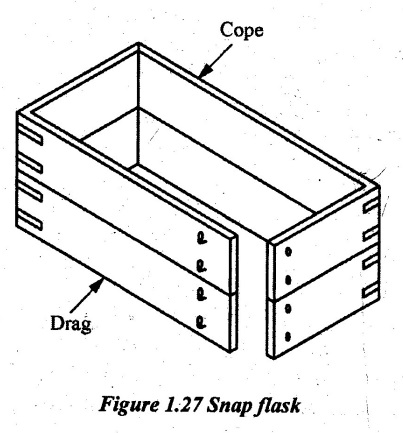
It is generally made of wood. It has hinges on one corner. Opposite corners have latches to lock the flask in a correct position. First, the flask is locked to make the mould. It is used in machine moulding to make small castings. After making the mould, the latches are unlocked and flask is opened out. The flask is removed from the mould. Number of moulds can be made with the help of one box in this way.
(b) Tight or box flask:
It is a box shaped container without top or bottom. It is made of metal or wood. It is used for making small and medium size moulds. The top part (cope) and bottom part (drag) are held in position by dowel pins or bolt and nut. This flask is removed from the mould only after the solidification of molten metal is completed.

6. Testing of Moulding Sand
Moulding sands have to be in correct size to ensure the proper sand quality as per the required level for accurate and good surface finished castings. Generally, the moulding sand contains silica sand grains, clay content and moisture content. So, the systematic evaluation of the working qualities of moulding sand is very much important before making mould for producing castings. Finally, the sound castings are produced by using this proper sand quality. Therefore, a proper control is necessary on moulding sand properties throughout its composition. The sand testing control provides a clear-cut idea about the moulding sand performance. It helps the foundry men to control the properties of moulding sands.
The following sand control tests are carried out on moulding sand.
1. Moisture content test
2. Clay content test
3. Grain fineness test
4. Permeability test
5. Strength test
6. Deformation and toughness test
7. Hot strength test
8. Refractoriness test
9. Mould hardness test
1. Moisture content test:
Moisture content plays an important role in moulding sand. It is estimated by the following three methods:
(a) Loss of weight after evaporation:
Construction:
On the top of the housing, an enclosure along with infrared heating bulb is connected. The enclosure is hinged at one end but it is freely supported at the other end. The infrared heating bulb is glowed on or off by operating a two-way switch which is provided on the side of the housing. The entire housing is mounted on the base.
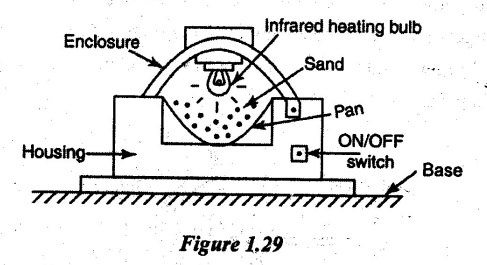
Working principle:
First, a measured quantity of sample is taken. Then this measured quantity is poured into the pan provided on the moisture determining apparatus. After this, the pan is closed by an enclosure. Now, the supply to the heating bulb is switched ON. Immediately, the infrared heating bulb emits heating rays towards the pan. The heating is done for 2 to 3 minutes. Thus, the moisture content present in the moulding is evaporated. Then, the supply to bulb is switched OFF. The dried sample is taken by opening the enclosure. Then, it is reweighed. The moisture content is determined by subtracting the final weight from original weight or initial weight.
Moisture content = W1 - W2
where,
W1 = Weight of the sand before drying
W2 = Weight of the sand after drying
Percentage of moisture content = W1 - W2 / W1 × 100
Advantages:
1. The process or test is simple..
2. Testing cost is very less.
Disadvantage:
1. Time consumption to perform this test is more.
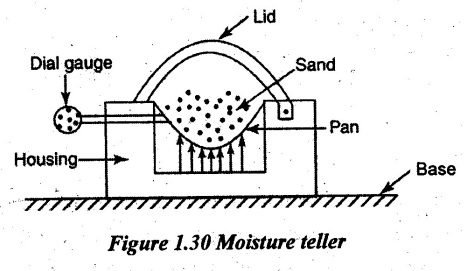
(b) Moisture teller method:
In this case also, the weighed quantity of moulding sand sample is taken and put into the pan. But the pan has nearly about 500 mesh screen in the bottom. Now, the pan is perfectly closed by the lid. Now, hot air is blown through the sand for 5 minutes. Due to this, the moisture content gets removed. After 5 minutes, the sand is reweighed in the same pan teller itself. Then, the loss in weight is indicated on the dial as moisture content which is already provided in the housing.
Advantage:
The method is quite and fast.
Disadvantage:
Cost of equipment is high.
(c) Moisture teller based on chemical reaction:
In the same teller machine, the weighed quantities of both sand and calcium carbide (CaC2) are put in the pan without mesh screen. The calcium carbide reacts only with moisture present in the sand but not with the sand composition. It produces acetylene gas (C2H2).
CaC2 + 2H2O → C2 H2 + Ca (OH)2
Depending upon the amount of acetylene gas and its pressure, the moisture content is determined. The moisture content is directly proportional to the pressure of acetylene gas. This pressure of C2H2 is again calibrated in a scale on the instrument itself.
2. Clay content test:
A weighed quantity of sånd sample, distilled water and 1% sodium hydroxide (NaOH) solution are put in the mixing device. The mixture is stirred nearly about 5 minutes. Then, it is allowed to settle down for 10 minutes at the bottom. The dirty water is removed from the top. Distilled water and 1% NaOH solution are again added with sand settled down at the bottom of the mixing device. Then it is stirred well and dirty water is removed off. The procedure is repeated again and again until the water at the top of the sand becomes clean. This water is drained completely and sand is dried well. Then the dried sand is reweighed. The loss of weight indicates the clay content.
Clay content = W1 - W2
where,
W1 = Weight of sand before drying
W2 = Weight of sand after drying
Percentage clay content = W1 - W2 / W1 × 100
3. Grain fineness test:
This test is carried out on completely dry and clay free sand. The test apparatus has a set of known values of graded sieves placed one over the other in the order of decreasing sieve sizes from top to bottom. So, the top most sieve is the coarsest one and finest sieve at the bottom most. The pan is placed under the bottom most sieve.
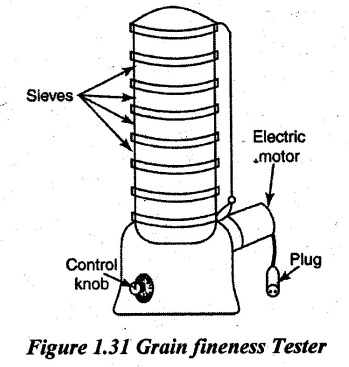
To test the fineness, the sand to be tested is put in the sieve. Then the entire sieve set is shaken or vibrated continuously for 15 minutes. After this, the amount of sand in each sieve is weighted. From this, the percentage distribution is found. Each percentage is multiplied by a factor called multiplication factor. Then the each product are added and divided by the total percentage of sand retained on pan and each sieve to obtain AFS (American Foundry men's Society) fineness number.
AFS grain fineness number = Total products / Total percentages of sand retained on pan and each sieve
As per AFS, the various sieve mesh numbers and its corresponding weighing factors or multiplication factors are listed below.
Sieve number: 6 12 20 30 40 50 70 100 140 200 270 pan
Multiplication factor: 3 5 10 20 30 40 50 70 100 140 200 300
4. Permeability Test:
Permeability is defined as the tendency of sand which allows the escape of gases or air through it when it is originated in the moulding sand due to pouring of hot molten metal.
Permeability can also be defined as the amount of air which will pass through the standard specimen of the sand under a given applied pressure over a particular period of time.
Permeability mainly depends on grain size, shape of the sand grains, clay content or binder content, grain distribution, ramming capacity and water content. The permeability indirectly refers to the porosity of the sand.

First, a weighed quantity of moulding sand is taken. Both clay and moisture content are added. Then these three are mixed well to ensure uniform distribution throughout the mixture. A 50.8 × 50.8 mm of standard sand specimen is prepared by a specimen rammer.
The sand specimen rammer consists of crank lever, cam, weight, gauge rammer rod and ram tube as shown in Figure 1.32. First, the moulding sand mixture is filled in the ram tube up to the level marked on it. Then, it is placed under the specimen pusher. The pressure is applied by the weight through the specimen pusher over the moulding sand contained in the ram tube. The applied pressure is measured by a dial gauge provided on the top of the rammer. It is done by operating the crank lever. When the crank lever actuates, the cam rotates and moves the rammer rod up or down. Therefore, the specimen pusher connected with the weight moves up and down. After applying sudden impact with a particular pressure, the moulding sand gets compressed to a standard height and diameter of 50.8 × 50.8 mm in a cylindrical form. So, this is the specimen to be tested for the property of permeability. Permeability number can be determined.
In two methods, the permeability test can be carried out.
1. Standard method
2. Rapid shop method
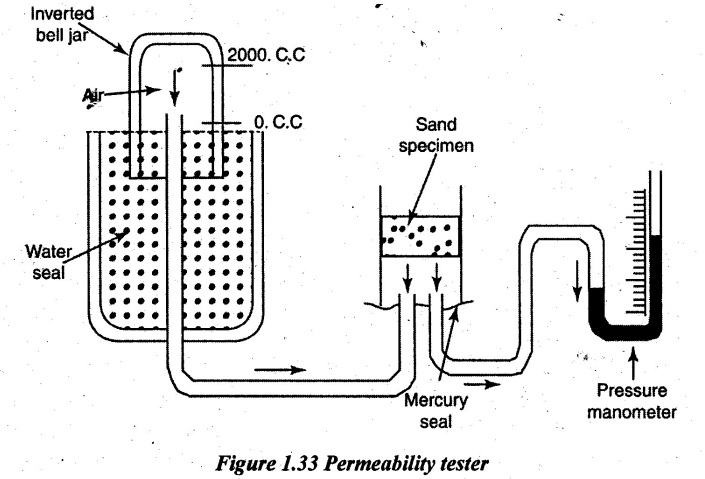
(i) Standard method:
The permeability tester consists of water seal, inverted bell jar, mercury seal and pressure manometer as shown in Figure 1.33. In this method, 2000 CC of air is filled in the inverted bell jar. This air is allowed to pass through the sand specimen. Now, the level of the mercury manometer changes with respect to the pressure of air.
At some point, the air entering the specimen becomes equal to the air escaped through the specimen. Due to this, the stabilized pressure occurs on the pressure manometer without changing its mercury level. The time required for passing 2000 CC of air through the sand specimen is simultaneously taken or observed using a stopwatch.
Permeability number can be determined by
Permeability number = VH /APT
where
V = Volume of air passed through the specimen (V = 2000 CC)
H = Height of the specimen = 50.8mm

T = Time taken by 2000CC of air to pass through the sand specimen in
minutes
P = Air pressure measured by the manometer.
5. Strength test:
This test is mainly carried out to measure the holding power or bonding power of green sand or dry sand. The various tests are carried out such as
(a) Compressive strength test
(b) Shear strength test
(c) Tensile strength test, and
(d) Bending strength test.
Among these tests, the compressive strength test is very much important. All these tests are carried on a universal testing machine. The test specimen of 50.8 mm × 50.8 mm (diameter × length) is prepared in a sand specimen tester machine using different attachments.
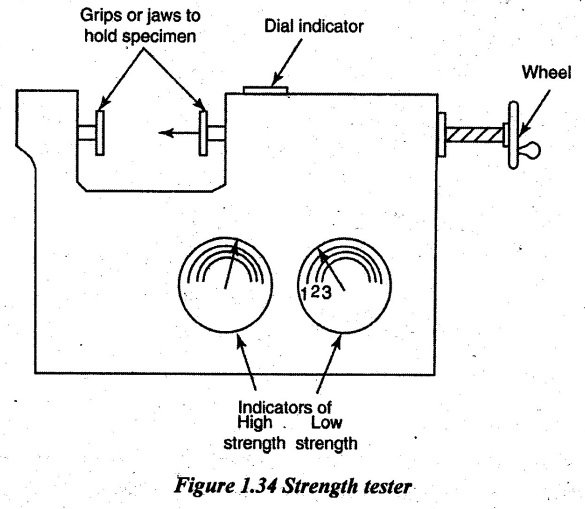
Indicators of high and low strengths, wheel, dial indicator and jaws are connected accordingly in the strength testing equipment as shown in Figure 1.34. The test specimen is just held between jaws. Now, the hand wheel is rotated to actuate the hydraulic mechanism. Thus, the hydraulic pressure is applied on the specimen. So, the deformation starts slowly on the specimen which is measured by the dial indicator fitted on the tester.
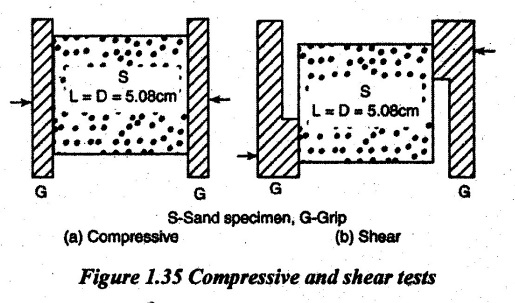
Two indicators are mounted on the tester. One indicator for testing low strength sand and the other indicator is for high strength sand. Each indicator consists of three scales for measuring compressive, tensile and shear strengths individually. The shape and size of the test specimen for compressive and shear strength are shown in Figure 1.35.
6. Deformation and toughness test:
Deformation is defined as the plasticity of sand that can be tested by reducing the length of specimen applying compressive force on it.
Higher deformation indirectly indicates the better capacity of the mould which means that it can withstand hydrostatic pressure as well as volumetric contraction of the moulding sand. The deformation of green compressive strength provides the quality of sand mix terméd as toughness. Therefore, the toughness number can be determined as
Sand toughness number = Deformation × green compressive strength
Toughness refers the ability of sand to withstand rough handling and strain when the pattern is withdrawn. Toughness number is also termed as shatter index number.
7. Hot strength test:
In this test, the cylindrical specimen with double end rammed of about 28 × 50 mm (diameter × long) is prepared on the sand specimen tester. This specimen is placed in a dilatometer and tested. For testing in the dilatometer, the specimen is heated from 500 to 2500°F and compressive force is applied over the specimen.
8. Refractoriness test:
In this test, the heated resistance curved platinum strip is resting against the periphery of the cylindrical sand specimen to analyse the sintering capacity of the moulding sand.
First, a cylindrical specimen of standard dimension is made using a sand specimen tester. This specimen is placed under the fire for nearly about 2 hrs at 1550°°C continuously. Then both the appearance and change in dimensions are noted. If the change in dimension is less than or equal to 7%, it indicates a good refractory sand specimen shape. A less refractory sand specimen is indicated by more shrinkage and distortion of the specimen.
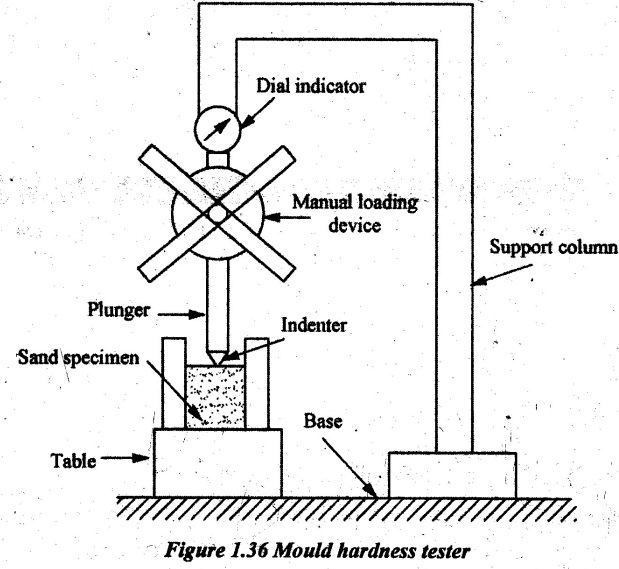
9. Mould hardness test:
Surface hardness indicates the ramming density of the actual sand mould. The hardness of the moulding sand is tested in an indentation hardness tester. The test specimen is prepared on a sand specimen tester. This specimen is placed on the table where the indentation or impression is to be formed. The indenter or impression to be formed is placed at the bottom most point on the plunger. The indentation is formed on the specimen by rotating the manual- loading device. Thus, the plunger is moved down. The force is applied on the specimen and it is maintained for the specified time and then it is released. Then the specimen is taken out and diameter of indentation is measured.
The mould hardness number can be determined by the following equation:
Mould hardness number = 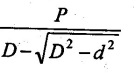
where
P = Force applied
D = Diameter of the indenter
d = Diameter of the indentation
Otherwise, the hardness test itself can be used for measuring hardness of moulding sand. The scale provided on the tester itself will indicate the hardness number.
7. Solved Problems on Moulding Sand Properties
Problem 1.1
The sand contains 10% of moisture in 50 gm before drying. Determine the weight of the sand after drying.
Solution:
Percentage (%) of moisture content = W1 - W2 / W1
0.1 = 50 - W2 / 50
⸫ W2 = 45 gm
Weight of the sand after drying, W2 = 45 gm Ans. 
Problem 1.2
The weights of the sand before and after drying are 75 gm and 60 gm respectively. Calculate the percentage of moisture content.
Solution:
% of moisture content = W1 - W2 / W1 × 100
= 75 - 60 / 75 × 100 = 20%
⸫ The percentage of moisture content is 20% Ans.
Problem 1.3
Determine the GFN (grain fineness number) for the given weight retained on each sieve as 0.7, 1.0, 1.2, 2.2, 2.4, 4.0, 9.8, 13.6, 7.2, 3.3, 2.0 and 0.6 gms.
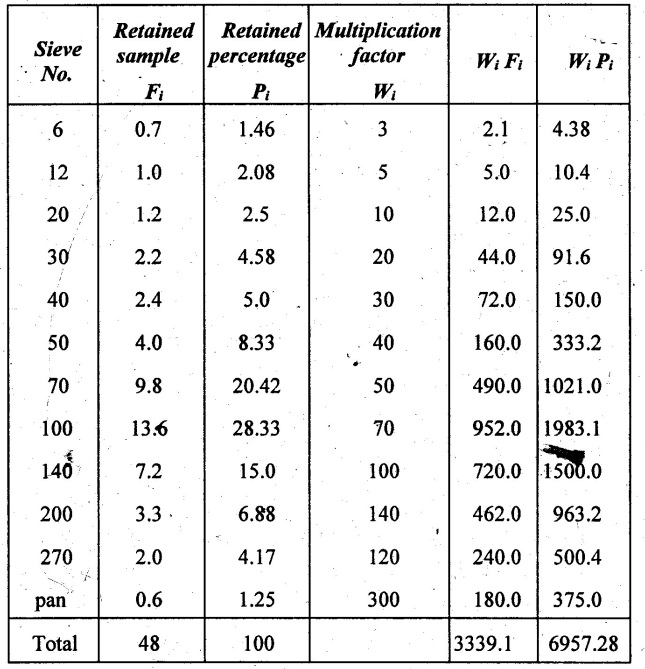
Retained percentage,

Grain fineness number,
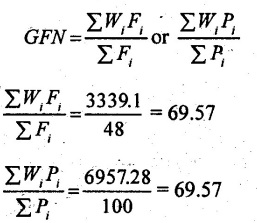
⸫ Grain fineness number, GFN = 69.57 Ans.
Problem 1.4
Determine the permeability number if 2000 CC of air takes 100 seconds to pass through a standard specimen 50.8 mm × 50.8 mm of length and diameter. The diameter indicates an air pressure reading of 10 gm/cm2.
Given data:
V = 2000 CC
H = 50.8 mm
d = 50.8 mm
P = 10 gm/cm2
T = 100 sec = 100/60 min
Solution:

⸫ Permeability number = 31 Ans.
No comments:
Post a Comment