Not all needed it, but the iron lung, a behemoth of medical engineering, became the lifeline for those whose muscles had betrayed them under polio's ruthless grip.
Imagine this: your body, a prison, your breaths, shallow whispers, as polio ravages your muscles, including those you never think about because they work on autopilot—the ones that let you breathe.
The iron lung worked on a simple yet ingenious principle: negative pressure.
It mimicked the natural breathing process when the diaphragm and chest muscles failed.
The patient lay inside this cylindrical chamber, sealed except for their head poking out, looking like some sci-fi astronaut in a retro space capsule.
As the machine created a vacuum, it forced the chest to expand, pulling air into the lungs—inhale.
Then, as pressure normalized, air was pushed out—exhale.
This mechanical ebb and flow were life itself for those inside.
Sadly, being encased in metal isn't living, it's surviving.
Patients often spent weeks, months, or even years in these contraptions, lying horizontal, staring at the ceiling or into mirrors angled for a view of the world beyond their metal cocoon.
The iron lung was a stopgap until medicine caught up with polio's challenge.
Vaccines eventually relegated polio to history books and iron lungs to museums.
But for a time, they were the bodyguards against an invisible enemy, holding the line one breath at a time.
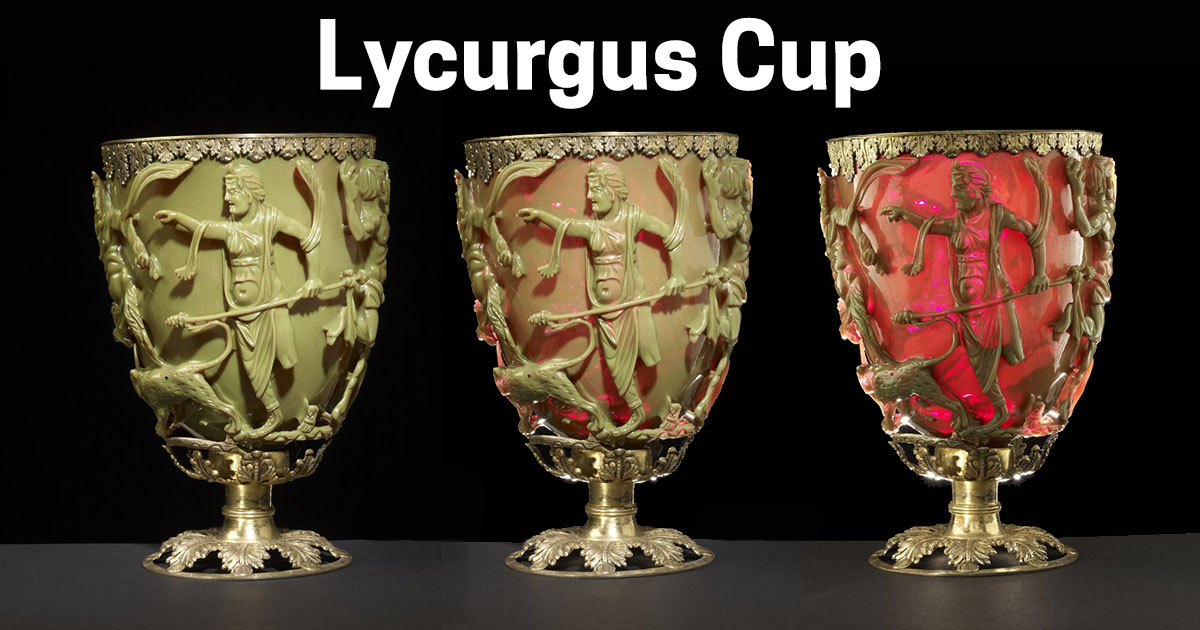
The “Lycurgus Cup” is one of the first to implement nanotechnology throughout history. Modern science has demonstrated exactly how advanced the processes behind the cup’s manufacture were, even if it is doubtful if the makers realized the explanation for the extraordinary optical qualities of the cup.
This cup has a unique feature that makes it change its color with the change of the light direction or intensity. How did this cup perform such a stunning task? And was nanotechnology used in its manufacturing process? Did the ancient Romans discover this technology at that time, or was it just a coincidence?
Let’s find out.
The Story Behind the Cup
Lycurgus Cup is a mysterious antique from the end of the Roman period (4th Century AD). It’s a “cage cup,” which means that the primary cup is encircled by a beautiful “cage” pattern. The design of the cage here portrays King Lycurgus of Thrace’s anger and death.
2/3. He’s attacking the vines with an axe, so I’m assuming it is the legend of Dionysus and King Lycurgus. Musee Gallo Romain, France. Photo Steven Cockings #romanmosaicpic.twitter.com/PUXSd5N6JG
At least one Greek and Roman story shows King Lycurgus as trying to kill Ambrosia, a follower of the god Dionysus (Bacchus for the Romans). According to this version of the legend, Ambrosia was transformed into wine by the gods who gathered around the king and killed him. On the cup relief, two of Dionysus’s followers mock the hapless king.
Nanotechnology Properties
Source: wikicommons
In addition to being a stunning piece of art, the “Lycurgus Cup” is also extremely valuable. With valuable metals like silver and gold in its construction, the cup is priceless.
The cup’s rim is decorated with a silver-gilt leaf band, and the foot has silver-gilt vine leaves in an open-work design. Historically, it’s believed to be from the fourth century AD or before.
Source: worldhistory
In terms of nano-materialistic qualities, the “Lycurgus Cup” stands noteworthy. It appears green in color when viewed under bright, direct light.
However, when the cup is lit from the inside or backlit, the cup’s major reliefs miraculously turn red. The king’s picture also changes to a slight shade of purple.
Source: By Vassil / wikicommons
Scientists didn’t discover why this happened until the 1990s, and it’s uncertain if the Romans did. The presence of nanoparticles, silver 66.2 %, 31.2 % gold, and 2.6 % copper, up to 100 nm in size, spread in a glass matrix was discovered to be responsible for the dichroism (two colors).
The gold particles absorb light at a wavelength of 520 nm, resulting in the reddish color displayed. The purple color is caused by bigger particles absorbing light, whereas the green color is caused by colloidal dispersions of silver particles with a diameter of more than 40 nm scattering light.
This video shows changes color and appears like transparent red:
Source: calpaterson
The Manufacturing Process
Source: lookandlearn
Making the Lycurgus cup is one of many old crafts that has been lost by time. There is just one complete example of this method left: the cup itself. To make dichroic glass (a color-changing glass), Western civilization appears to have found the process only during the mid-20th century.
For its purposes, NASA, on the other hand, employs nanotechnology (gold and silver nanoparticles), an area of material science that was surely unavailable to ancient Romans. So, how did the Romans manage to infuse a glass cup with gold and silver nanoparticles?
According to what I’ve read, molten glass is mixed with nanogram quantities of gold or silver dust before being diluted with additional molten glass until the ratios are as low as possible. However, I’m unsure of how the gold and silver dust is broken down from dust size to nanoparticle level – indeed, this process is the lost secret.
Accident or Intention
Because it’s unclear how the Romans manufactured the glass, there’s some controversy regarding whether it was done “by accident” or not. Suppose the Romans had some sort of glass-blowing plant next to a goldsmith’s shop. In that case, some believe that kilns or equipment somehow had tiny gold and silver particles on them, which somehow entered the cup in the glassmaking process.
Source: New Forest Knowledge
However, there’s a chance that the Romans had some insider knowledge of glassmaking that we don’t. In ancient Rome, glassmaking was a relatively popular job, but because so much glass was recycled, there aren’t many Roman glass fragments in museums now.
A society where a large number of individuals work “empirically” with glass on a regular basis could learn something about the process of glassmaking that we don’t know now. Who knows?!
Where is it Now?
The “Lycurgus Cup” is largely believed to have spent the overwhelming majority of the intervening years above ground because of its outstanding state. Perhaps it was taken out of a grave early on in its existence, or perhaps it was stored in the church’s treasures like many other magnificent Roman artifacts.
The Lycurgus Cup is the only complete example of colour-changing dichroic glass from ancient Rome.
We may never learn the complete story of the object’s past, but we do know that it was owned by Baron Lionel Nathan de Rothschild sometime in the 1800s. Afterward, it was given to the British Museum in 1958, where it has been kept safe forever.
Playing tricks on people is nothing new. Throughout history, people have set each other up for funny pranks. One of those things that never goes out of style is the Pythagorean Cup.
Pythagoras, the ancient Greek philosopher and mathematician, is responsible for one of history’s most memorable practical jokes. Pythagoras, the Greek mathematician, best known for his eponymous theorem, is also known for creating the Pythagorean Cup, a clever prank that has been fooling people for centuries. Who said mathematicians couldn’t have a sense of humor?
Even now, many are fooled by the clever shape of the cup. Let’s take a look at one of the world’s greatest pranks’ fascinating history and engineering.
Discovering the Cup Design
Source: By M Todorovic / wikicommons
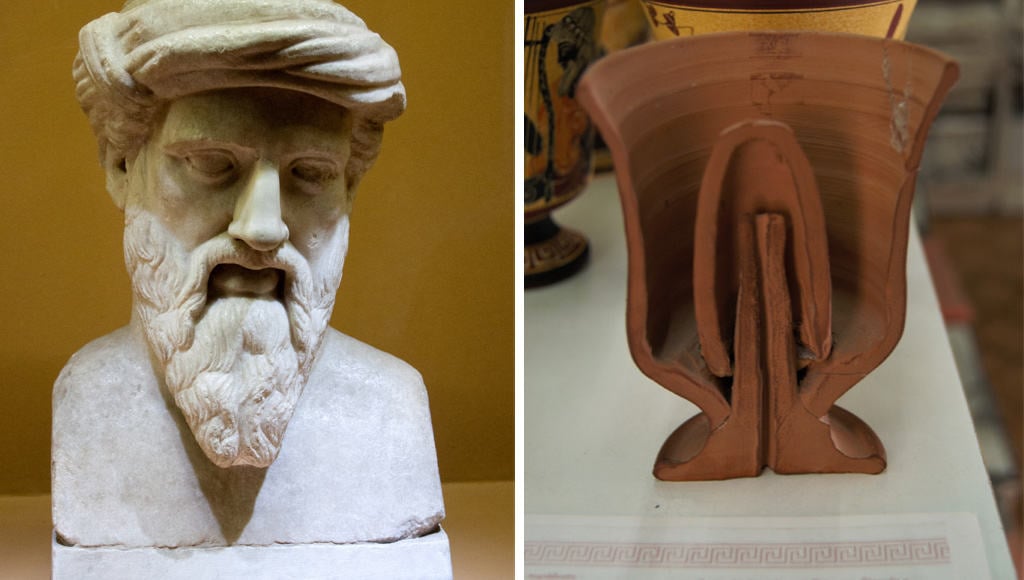
The Pythagorean Cup is an easy puzzle to solve. The Pythagorean Cup differs from other cups in that it has a tiny column in the center instead of a single empty cup. The column is linked to the cup’s stem. The hollow stem of the cup leads to a little hole at the bottom of the cup.
There is an open chamber within the column. A tiny hole in the column allows liquid to flow from the cup to the central column. Drinking from a cup isn’t problematic if you fill it to a level just below the tip of the column. However, if you overfill the cup, you’ll encounter difficulties.
Source: By Nevit Dilmen / wikicommons
Using Pascal’s theory of communicating vessels, this prank is possible. Small holes in the cup’s base and the column’s stem allow liquid to enter the cup when it’s full, and it exits via the bottom and the stem. This enables the entire cup to be drained by creating a siphon. Consequently, attempting to overfill a glass will result in the loss of all of the liquid that you’ve just poured.
This video shows how this cup works:
The Pythagorean Cup’s Origins: A History of the Prank
Source: wikicommons
According to popular belief, Pythagoras of Samos is to blame for the creation of the cup.
During Pythagoras’ lifetime, between 570 and 495 BCE, the cup is considered to have been first used in the mid-6th century BCE. According to one story, Pythagoras made the cup as a way to punish his friends for being greedy and filling their wine glasses to the maximum. Thus, it is sometimes referred to as the “Greedy Cup” in reference to this story.
Source: Annielogue / Wikimedia Commons
It is also possible that the cup was designed by Pythagoras as a reminder for people to drink responsibly. You can normally drink from the cup if the liquid level is below a specific point. However, if you pour above that level, all the liquid will drain away. There is no doubt that it had an impact, whether it was meant as a kind of punishment or a lesson to drink responsibly. People all across the world have been inspired by the Pythagorean Cup’s basic design, and it is still a popular practical joke.
Make Your Own Pythagorean Cup to Prank Your Friend!
The old ritual of having your buddies spill their drinks all over themselves is waiting for you if you want to participate. Pythagorean Cups can be created in a variety of ways at home. Even though it’s possible to get one from an internet store, why bother? Make your own Pythagorean Cup and see how it turns out!
When it comes to designing your own cup, you have a few choices. 3D printing the cup might be an option if you want to take the prank to the next level. An instructional video from 3D Printing Nerd tells you just how it’s done. If you have access to 3D printing technology, this design is worth a try.
If you want to get back to your roots, you may make your cup out of clay, exactly like the ancient Greeks.
Beginner sculptors may learn how to make a Pythagorean Cup from scratch using one of the many online video instructions available. You’ll be able to show off your artistic abilities and play pranks on your buddies at the same time. That’s a win-win situation for everyone!
Are there any other pranks you can think of that uses science and engineering in creative ways?
In the building industry, Tensegrity Structures are an interesting development. Buckminster Fuller, the famed architect, was no exception to the rule that architects are constantly in search of the challenging and unique. His experiments with various architectural and structural concepts resulted in one of the smartest advancements in the building industry: Tensegrity, which he named the “fuller world.”
In human bodies, the spine is the closest and most straightforward example of a tensegrity structure. When it comes to constructing structure systems, compression force is the most common. In contrast, tensegrity structures are constructed using the tension force, which is a pulling force transmitted by using a string, a cable, a chain or other material.
How does Tensegrity Works?
Tensioned components are maintained in place by a set of bars (the compressed elements) that are not connected to each other. Each bar is under continuous compression, and each tensioned part (chain, cable…) is under continuous tension.
As seen in the picture below, the “floating” object is being pulled in two directions by the red vectors, while the green vector represents the object’s weight.
Source: physicslens
The string from which the object’s lowest point is hanging exerts an upward tension (seen below) that makes this feasible. The object’s weight creates a moment of stress that is counterbalanced by the other tensions. It’s easy to see where the “floating” structure’s center of gravity is in the accompanying figure, where the green vector denotes the structure’s weight. With the help of the strings, two smaller downward vectors are balanced by weight and provide stability to the structure’s sideways motion.
Features of Tensegrity Structures
Mechanical equilibrium:
When viewed up close, the structure appears to float, yet it is actually solid even with the limited usage of stiff parts. As a result of this mechanical equilibrium, the tensile and compressive components remain stable.
Pre-Stress:
Tensegrity structures have previously been subjected to “self-stress” or “prestress,” in which each component is already under stress. They are further pushed by each other, a state that is known as “self-stress” or “prestress.”
Flexible:
Even though they are held in place by pre-stressing, tensegrity structures are extremely sensitive to external forces. When the structure is bent, its components rapidly reposition themselves and do so reversibly and without breaking.
Super Harmonic:
Because the parts are so closely linked, what affects one affects them all, resulting in a completely integrated harmonic system.
Modifying:
It’s possible to create an even more complex system of tensegrity structures by combining many tensegrity structures together. Disruption of an individual tensegrity unit in these systems does not compromise the overall system integrity.
Top 7 Tensegrity Structures
Dissipate at Afrika burn
Source: Jhono Bennett
Kurilpa Bridge – Australia
Source: Tupungato/Shutterstock
The Biosphere – Montreal
Source: meunierd/Shutterstock
Munich Olympic Stadium
Source: meunierd/Shutterstock
Needle Tower By Kenneth Snelson – Washington
Source: Bakusova/Shutterstock
Denver International Airport
Source: Arina P Habich/Shutterstock
Nasa Super Ball Bot
Source: NASA SuperBall
Watch the following video by Steve Mould on YouTube to see how tensegrity structure work in action:
Have you ever encountered a table held together solely by wires, seemingly defying gravity and common sense? That’s the magic of tensegrity, a captivating structural principle where compression and tension work in harmony to create surprisingly strong and adaptable forms. Dive into this fascinating world as we explore the mechanics of tensegrity with simple 2D models and then venture into real-world applications like bridges and even the human body!
Building with the Dance of Forces:
Imagine a structure where rigid rods are squeezed (in compression) and held in place by stretchy bands (in tension). That’s the essence of tensegrity. Each component plays a distinct role: rods resist crushing, while bands pull back when stretched, maintaining the structure’s integrity.
2D Models: Unveiling the Invisible:
To grasp the concept better, let’s build a 2D tensegrity model using rubber bands. By trying to collapse the structure, we witness how stretching bands always fight back, restoring equilibrium. We even introduce constraints (fixed strings) to explore stability in 3D space, highlighting the need for a minimum of three cables for true 3D stability, much like a stool needs three legs.
A Balancing Act: From Wobbly Tables to NASA Landers:
Tensegrity structures, despite their intriguing looks, can be incredibly strong and adaptable. We discover a Lego tensegrity table that utilizes just two cables for stability, defying expectations. Furthermore, a more complex Lego design showcases how varying cable lengths can even enable robotic movement!
Nature’s Inspiration and Human Ingenuity:
Did you know your own body incorporates tensegrity principles? From bones under compression to muscles, tendons, and ligaments in tension, our bodies demonstrate nature’s optimization for strength and lightness. Likewise, architects and engineers have embraced tensegrity, constructing marvels like the Kurilpa Bridge in Australia.
Beyond Gravity: Auxetic Twist and a Hidden Surprise:
The journey takes an unexpected turn, introducing “auxetic” structures, which contract in one direction when squeezed in another. Interestingly, some tensegrity designs, like the NASA lander, exhibit this fascinating property! As a final treat, the exploration reveals a hidden gem: a tiny fish that hitched a ride on a water pump built using tensegrity principles, highlighting the unexpected connections and discoveries science can lead to.
Beyond This Article: Deeper into the Tensegrity Universe:
This article serves as a mere glimpse into the captivating world of tensegrity. If you’re curious to learn more, delve deeper into the fascinating mechanics, applications, and hidden connections of this unique structural principle. Remember, science is full of surprises, and sometimes, the most intriguing discoveries come from the most unexpected places!
When flying, have you ever noticed a little hole in the middle glass of the window? Many plane windows do have holes. However, this isn’t true of all of them. Some passengers think it’s a manufacturing flaw when they see it, but there’s a good explanation for it.
Explained: Window Bleed Holes
Bleed holes” are what you see in airplane glass. Lexan polycarbonate or plastic acrylic are the most common materials used in airplane windows because of their low weight and flexibility. The bottom center of the middle pane normally has a single bleed hole. Why are these bleed holes necessary?
Source: Gizmodo Australia
Bleed holes are primarily meant to maintain air pressure when the plane’s altitude rises. A typical commercial aircraft flies at the height of between 28,000 to 35,000 feet – more than six and a half miles. At these elevations, the air is very thin and lacks any kind of pressure, making it difficult to breathe. To ensure a safe and comfortable atmosphere for passengers and crew, planes pressurize the cabin. When the cabin air pressure is higher than the air pressure outside the aircraft, it pushes on the windows in an effort to balance out.
Source: AARON FOSTER/GETTY IMAGES
High altitude air pressure can cause the glass of an airplane to crack or shatter, but they’re built to endure the strain. To assist reduce some of this tension, they are frequently built with a bleed hole. The bleed hole is situated in the central pane, allowing pressured air to reach the outer pane. Bleed holes allow pressured air from within the cabin to reach the exterior glass of the window, thereby acting as a bleed valve. If there is no bleed hole, the inner glass of a window would be subjected to high pressures. Pressure can be transmitted to the outer pane through a bleed hole, reducing the stress on the inner and middle panes. As an added precaution, in the event that the outer glass ruptures or otherwise fractures, bleed holes are included.
A hole in an airplane window isn’t anything to be frightened about when flying. Known as “bleed holes,” they are not a flaw or a symptom of damage in airplane glass. Their function is to maintain a pressure differential between the inner and outer panes of a window so that the outer pane is always exposed to pressured air. It equalizes the pressure in the cabin by transferring pressured air from the inside to the exterior.
Did you know that tungsten melts more than 3400°C (6200°F) higher than mercury? Tungsten is the metal with the highest melting point, but why does it take so much energy to transform tungsten from solid to liquid?
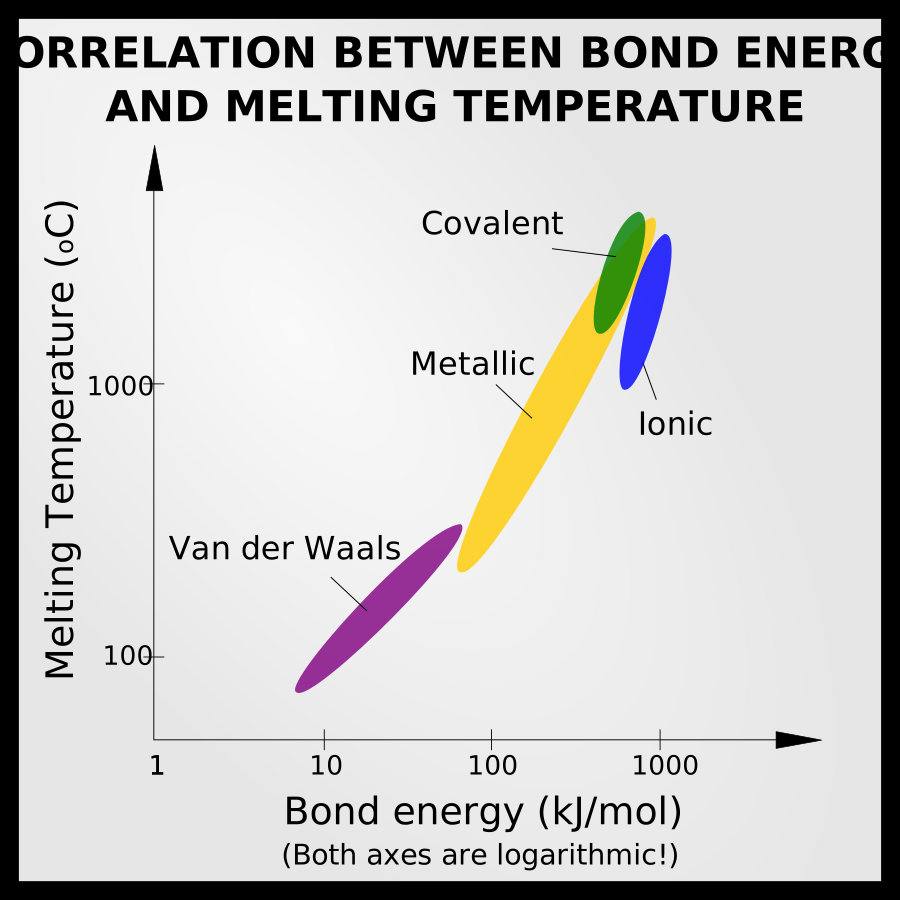
The melting point of a material is primarily related to bond strength. Materials with strong bonds between atoms will have a high melting temperature. However, other factors–such as crystal structure, atomic weight, and electron structure–can also influence the melting point.
But before we dive into an article focused on metals, I want to quickly point out that metals don’t necessarily have the highest melting point when compared to other materials.
Metallic bonding is definitely stronger than Van der Waals bonding, but ceramics (which have ionic or covalent bonding) have even higher melting points! Graphite, hafnium carbide, tantalum carbide, and other ceramics have even higher melting points than tungsten!
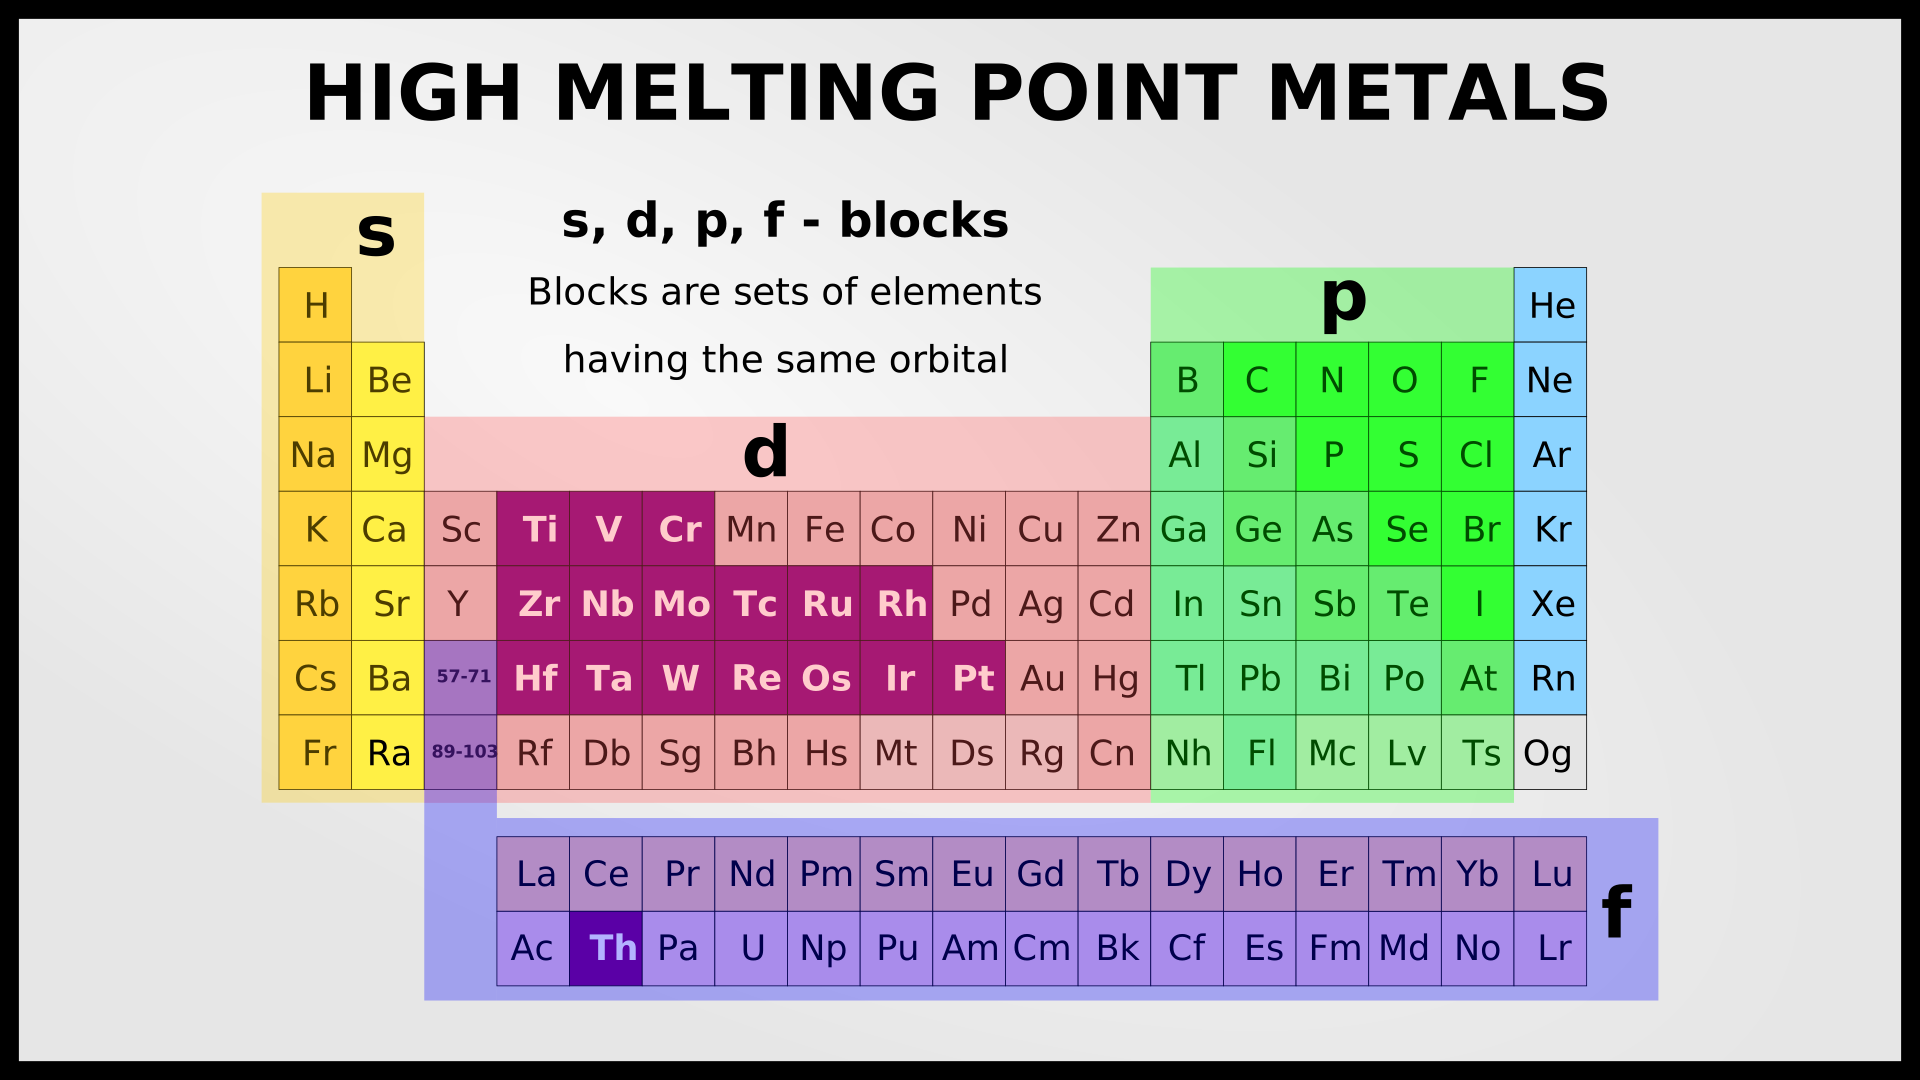
Before I get into a scientific explanation, here’s that list of those 17 elemental metals with the highest melting points. (I’ve also listed the crystal structure, which will come up later). As you can see, tungsten is #1 with an astonishing 3380°C melting point.
Tungsten (W) 3380°C, BCC
Rhenium (Re) 3180°C, HCP
Osmium (Os) 3027°C, HCP
Tantalum (Ta) 3014°C, BCC
Molybdenum (Mo) 2617°C, BCC
Niobium (Nb) 2468°C, BCC
Iridium (Ir) 2447°C, FCC
Ruthenium (Ru) 2250°C, HCP
Hafnium (Hf) 2227°C, HCP
Technetium (Tc) 2200°C, HCP, Radioactive
Rhodium (Rh) 1963°C, FCC
Vanadium (V) 1902°C, BCC
Chromium (Cr) 1857°C, BCC
Zirconium (Zr) 1852°C, HCP
Platinum (Pt) 1769°C, FCC
Thorium (Th) 1755°C, FCC, Radioactive
Titanium (Ti) 1670°C, HCP
High Melting Point Alloys
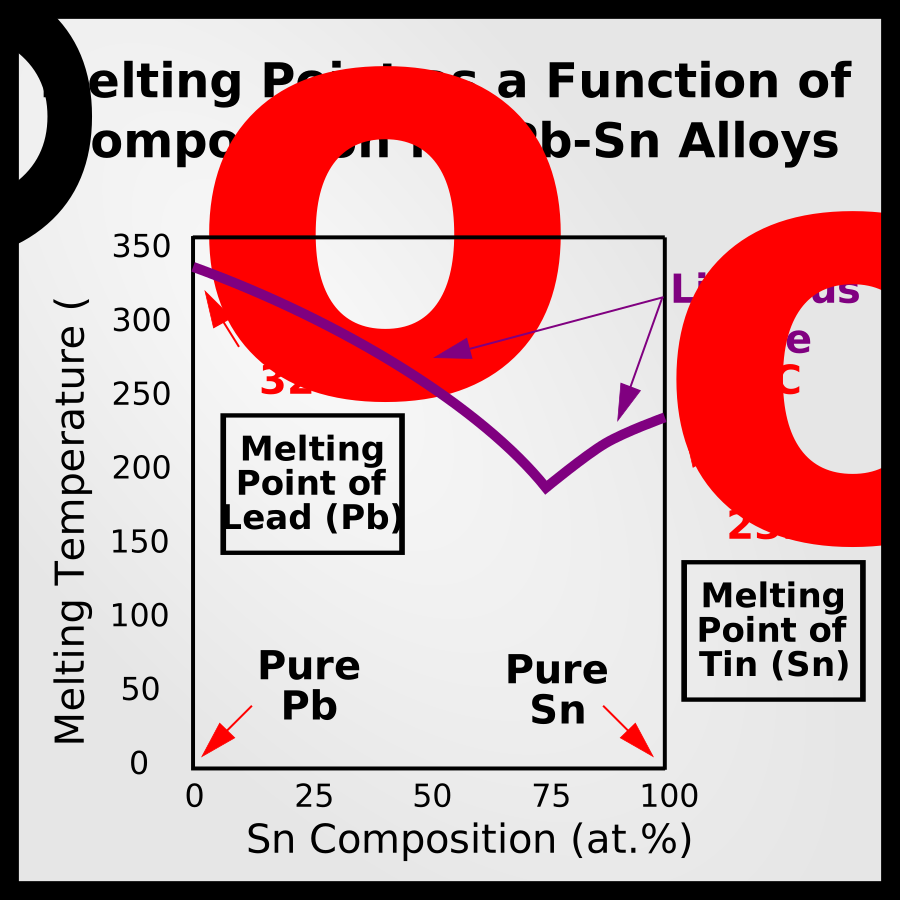
High melting point alloys are actually not a real category of material. Any time you combine metals in solid solution (i.e. make an alloy), the melting point will decrease.
If you wanted a metal with a high melting point, you’d probably have to choose a pure metal. In many cases you could probably get away with slight alloying from one of the pure elements listed above, but it’s not really possible to engineer alloys for increased melting point.
“High temperature” alloys are a real category in materials science. In most cases, materials fail in high temperatures waaaay before they would melt. High temperatures make metals softer and more susceptible to oxidation or corrosion.
This article is purely about the phenomenon of metals that have high melting points, but superalloys (Ni, Co, or Fe based, 1300-1500°C in the upper range), titanium alloys, and tungsten alloys can be considered high temperature alloys because of their combination of high melting point, good strength at high temperatures, and oxidation/corrosion resistance
What Is the Reason for High Melting Points?
The simple answer is: bond energy.
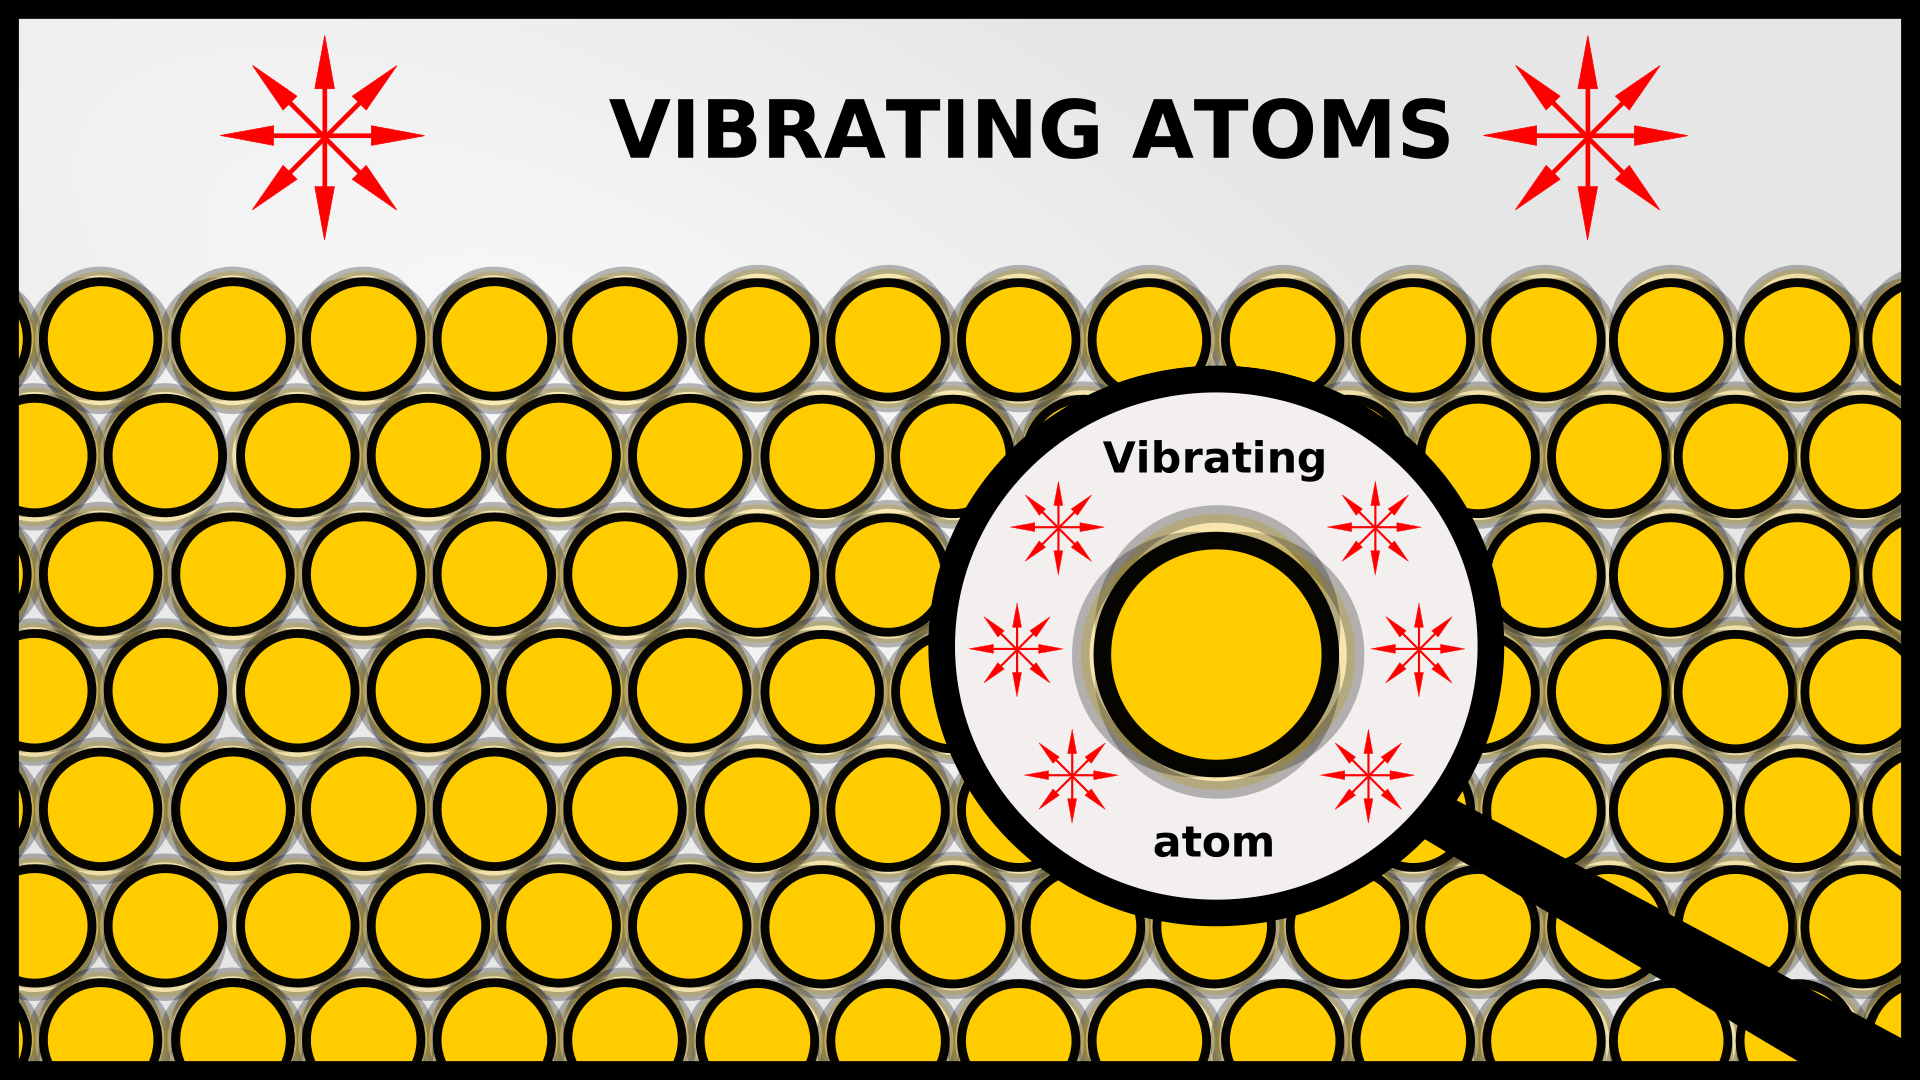
A solid can be visualized as a group of atoms bonded together that vibrate back and forth, but generally stay in the same position.
The vibration of the atoms–their kinetic energy–is what we normally call “temperature.” Higher temperature means that the atoms vibrate faster. At some point, they vibrate so quickly that they can break their bonds and slide past each other.
Each atom has a different vibration, so even in the solid state there are some atoms which are able to temporarily break their bonds and move through the material. This phenomenon is called “diffusion.”
“Melting” is when most of the bonds break. In crystalline solids like metals, all the bonds are the same length–and strength–so there is a precise point where almost all the atoms gain enough thermal energy to break their bonds. The more energy it takes to reach that point, the higher the melting point.
So when do the atoms reach this point?
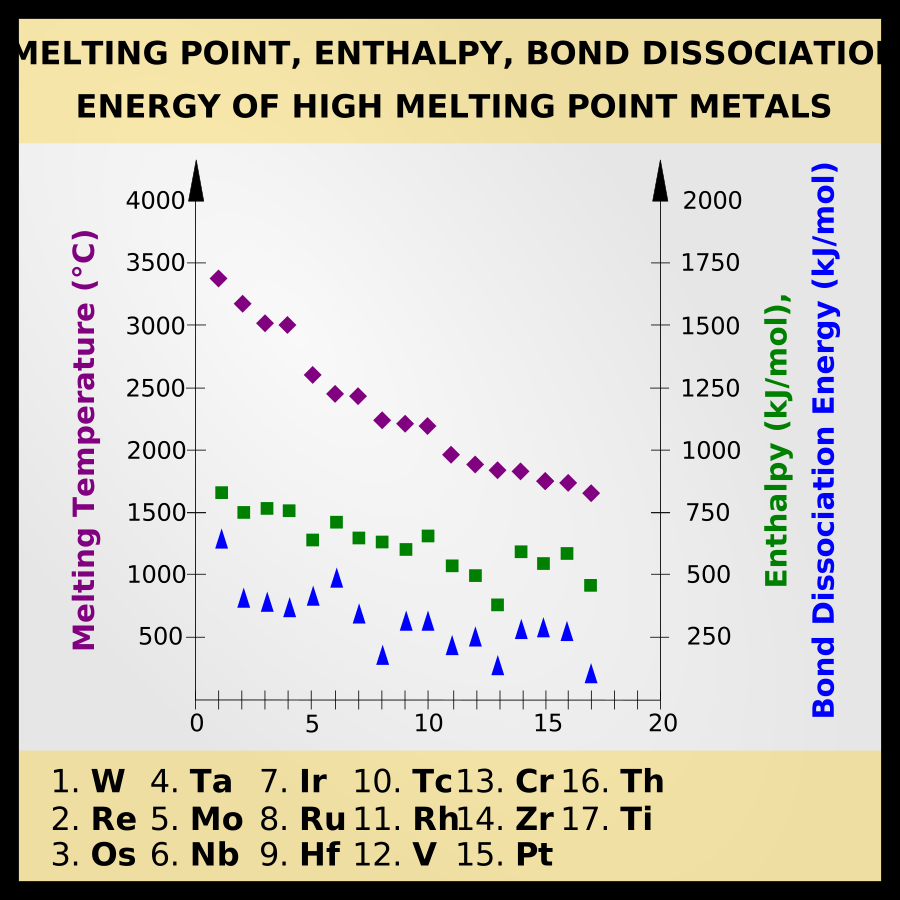
The most obvious factor is the direct bond strength. Bond strength is a bit hard to quantify, but two measures of bond strength are the enthalpy of formation, which is the enthalpy change to form a mole of material, and bond dissociation energy, which is the energy released from breaking a bond between two atoms.
In Callister’s table of bond energies, the textbook is actually tabulating enthalpy of formation. Here is a graph of bond strength (represented by enthalpy of formation AND bond dissociation energy) compared to melting point.
Now, there are a few more properties that influence the melting point, but wouldn’t be considered in the enthalpy of formation or bond dissociation energy. For example: how many bonds surround the atom?
In general, we consider that most effects from bonds are the result of an atom’s nearest neighbors, or the ones directly “touching” it. (Although there is an effect from atoms nearby as well–for example, if you make nanoparticles with only a few atoms altogether, the bonds are fewer than usual and the nanoparticle will have a lower melting point than the bulk material).
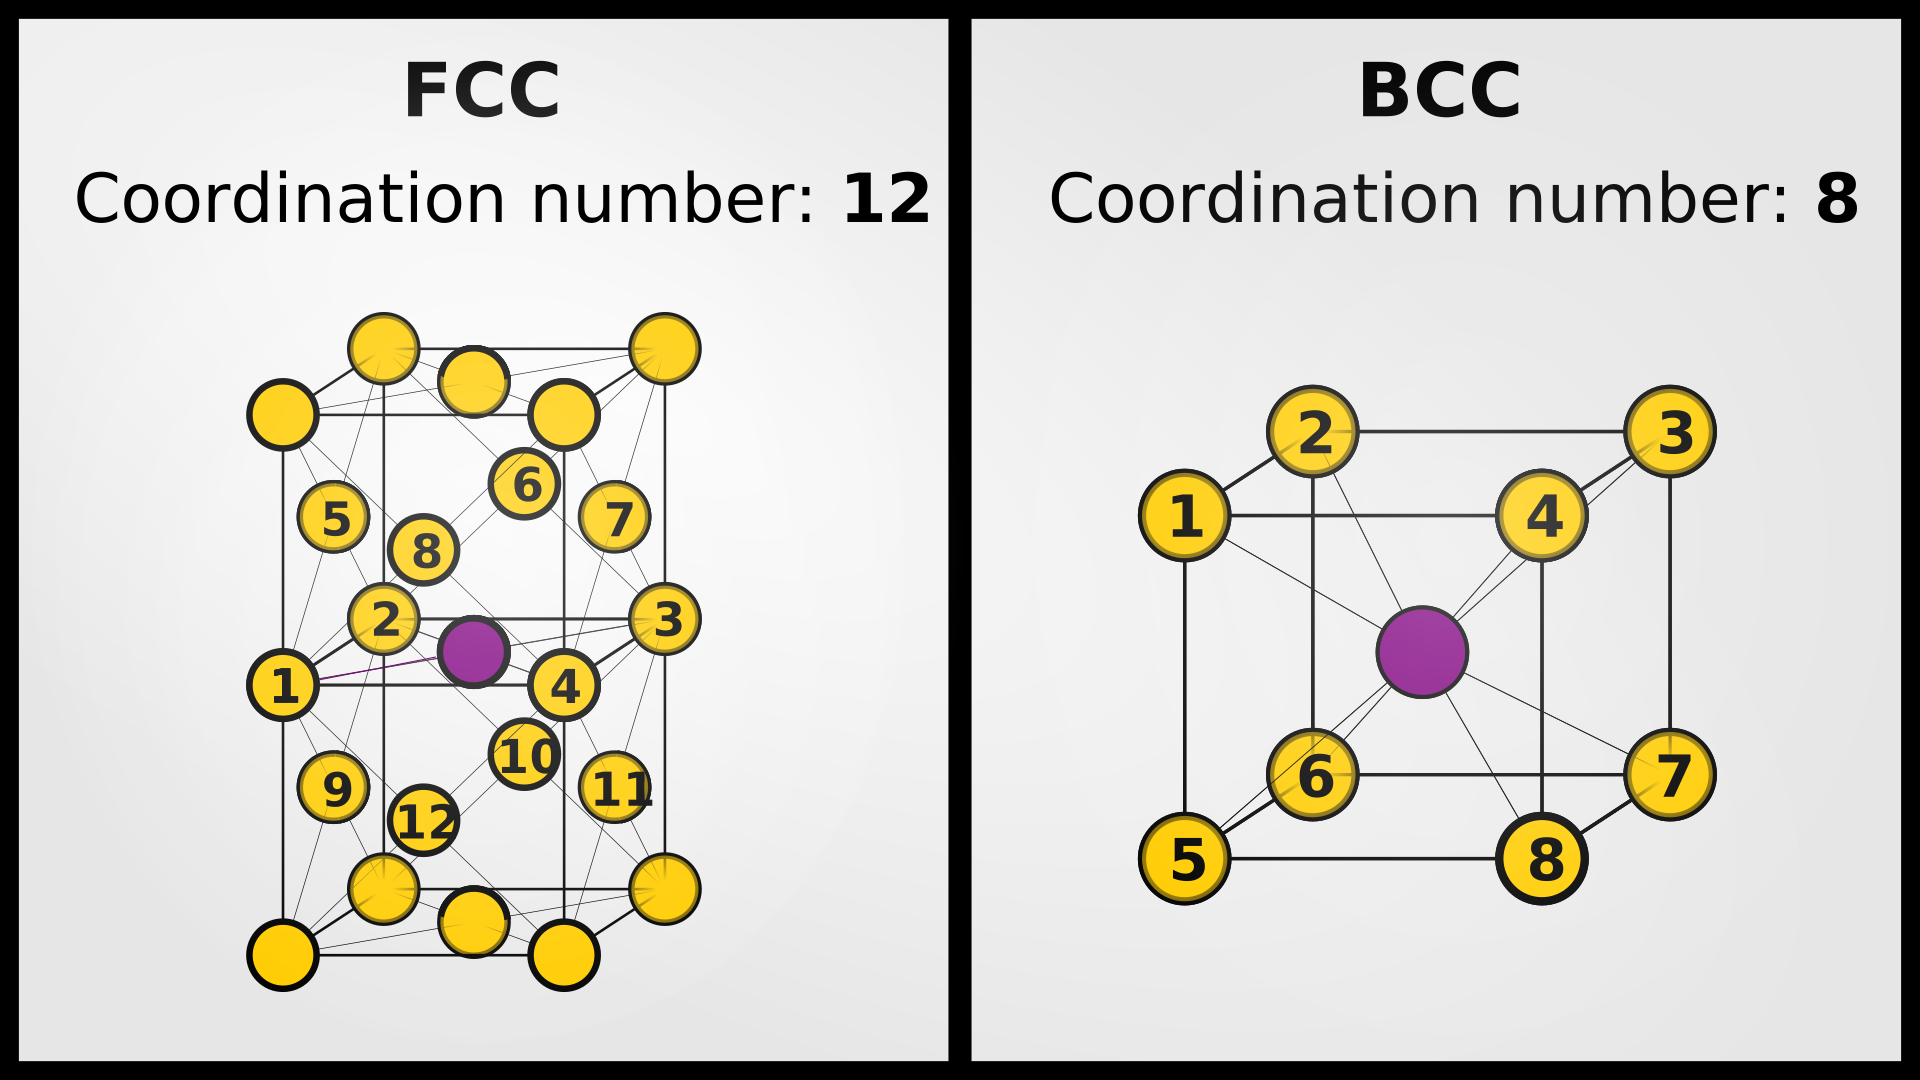
An element’s crystal structure determines the bond length and number of nearest neighbors (also called “coordination number”). This influences the bond strength in a way that is not captured by bond dissociation energy, but is reflected in melting point.
That’s why elements with high melting points tend to have crystal structures with high packing: FCC, HCP, or BCC. In fact, the elements with the highest melting point usually have a BCC structure. BCC is almost close-packed so it’s quite stable, but I suppose the slightly lower density allows the atoms to wiggle more without needing to liquefy. For a (very complex) mathematical proof of why BCC tends to be the most stable high-temperature phase, check out this paper by Alexander and McTague.
Because metallic bonding means atoms are surrounded by a sea of electrons, there are also a few characteristics of the electronic structure of the atom which can also impact bond strength as measured by melting.
For example, you’ll notice that many of the metals with high melting points have partially full d-suborbitals.
That means these atoms have a lot of electrons to contribute to the sea of electrons, generally increasing the interactive forces in the metal.
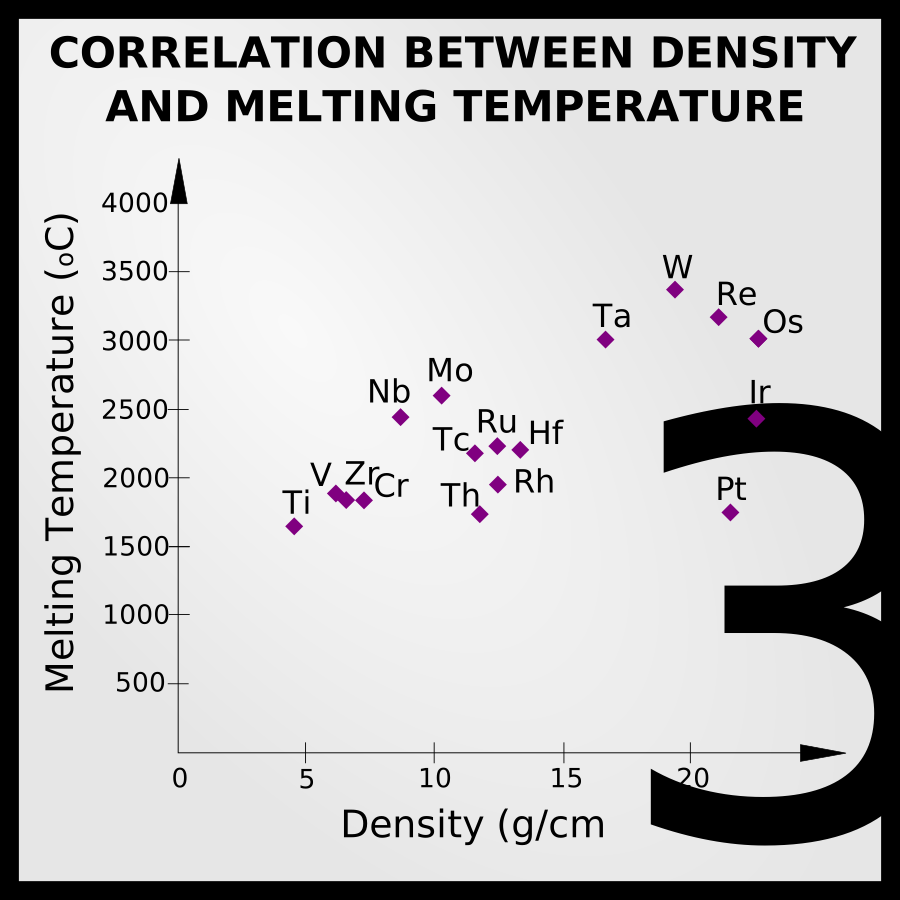
Larger atoms also tend to be packed more tightly and weigh more. Since kinetic energy is , heavier atoms will be vibrating more slowly at the same temperature as a lighter atom. Slower vibrations means that atoms will have more time to interact with each other, which may also contribute to a higher melting point.
What Are Common Properties of High Melting Point Metals?
Since I’ve chosen 17 elements with the highest melting point, these elements are quite diverse. Their melting temperatures range from 1670°C and 3380°C, so they don’t have that much else in common.
However, they all have BCC, HCP, or FCC crystal structures, which are the closest-packed, most stable crystal structures.
The metals from my list with the highest melting point are also refractory metals. These are a special kind of metal with a specific set of properties. You can read all about refractory metals in this article, but in short, they are:
Dense
Hard (especially tungsten and rhenium)
Chemically inert
Easily oxidized
Creep resistant
The refractory metals also have a BCC crystal structure (except for rhenium, which is HCP).
Applications of High Melting Point Metals
There are many applications that require metals with high melting points. For applications like incandescent light bulb filaments, which just require a high melting point metal and nothing else, tungsten is usually the metal of choice.
Tungsten is the metal with the highest melting point. It is also relatively cheap, so there isn’t really an argument to use “cheaper” metal with a slightly lower melting point. Elements like rhenium, tantalum, and molybdenum are typically used because they have some other properties in addition to high melting point (for example: lower density).
Tungsten (W)
Rhenium (Re)
Osmium (Os)
Tantalum (Ta)
Molybdenum (Mo)
Niobium (Nb)
Iridium (Ir)
Ruthenium (Ru)
Hafnium (Hf)
Technetium (Tc)
Rhodium (Rh)
Vanadium (V)
Chromium (Cr)
Zirconium (Zr)
Platinum (Pt)
Thorium (Th)
Titanium (Ti)
Final Thoughts
There you have it! The 17 metals with the highest melting point–generally speaking, because they have the strongest bonds.
A specific subset of this group with the highest melting points, such as tungsten, rhenium, and tantalum, are called refractory metals. You can read all about refractory metals by clicking this article!












 , heavier atoms will be vibrating more slowly at the same temperature as a lighter atom. Slower vibrations means that atoms will have more time to interact with each other, which may also contribute to a higher melting point.