What are the Parts of the Nebulizer Machine?
- A nebulizer consists of several parts that work together to convert liquid medication into a fine mist that can be inhaled into the lungs.
- Here are the main parts of a standard nebulizer:
Nebulizer Cup/Medication Chamber
- This is where the liquid medication is placed.
- The nebulizer cup typically has a cap or lid to secure the medication and prevent spillage during nebulization.

Mouthpiece or Mask:
- The mouthpiece is a small tubular attachment through which the patient breathes in the misted medication.
- Masks are used for patients who might have difficulty using a mouthpiece, such as children or individuals with certain medical conditions.

Tubing:
- The tubing connects the nebulizer cup to the air compressor.
- It allows the pressurized air or oxygen to be directed into the medication chamber to create the mist.
Air Compressor:
- The air compressor is the main device that provides the necessary airflow to convert the liquid medication into a mist.
- It generates either compressed air or oxygen, depending on the nebulizer type.
Power Cord:
- The power cord connects the air compressor to a power source, allowing it to operate.
On/Off Switch:
- The on/off switch controls the power supply to the air compressor.
- It is used to start and stop the nebulization process.
Vibration Mesh or Jet Mechanism:
- In jet nebulizers, a mechanism generates a high-velocity stream of air that breaks down the liquid medication into a mist.
- In some nebulizers, like mesh nebulizers, a mesh or membrane with tiny holes is used to create the mist through vibration.
Medication Reservoir
- The medication reservoir is where the liquid medication is held before it’s drawn into the nebulizer cup for nebulization.
Filters:
- Some nebulizers have filters to prevent dust, debris, and contaminants from entering the nebulizer.
- These filters need to be replaced periodically as part of the maintenance routine.
Airflow Control:
- Some nebulizers allow you to adjust the airflow rate, which can influence the size of the mist particles being produced.
Carrying Bag (Optional)
- Many portable nebulizers come with a carrying bag for easy transportation and storage.
Instruction Manual
- An instruction manual provides guidance on assembling, operating, cleaning, and maintaining the nebulizer properly
- It’s important to note that different types and models of nebulizers might have variations in the design and specific parts.
- Always refer to the manufacturer’s instructions and your healthcare provider’s guidance when using your specific nebulizer model.
- Proper maintenance, cleaning, and usage are crucial to ensure the nebulizer functions effectively and delivers the intended medication dose.
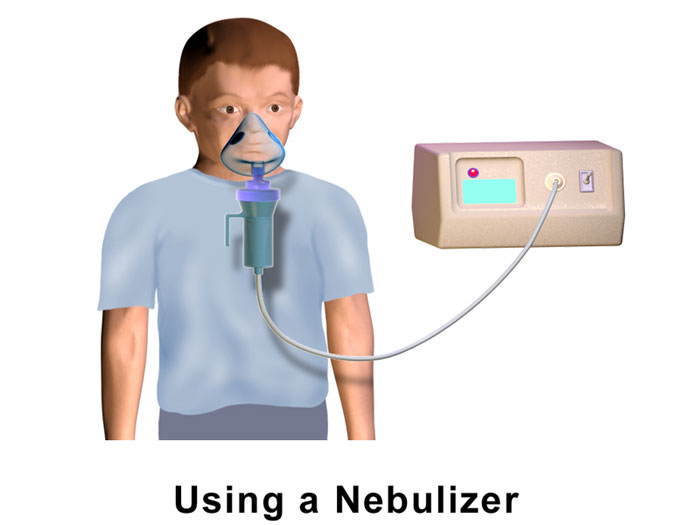
Use Nebulizer for Cough in Home
- Using a nebulizer at home for treating a cough or respiratory issues involves similar steps to the general instructions provided earlier.
- Here’s a step-by-step guide specifically for using a nebulizer at home to help alleviate a cough:
Gather Your Supplies:
- Make sure you have the nebulizer machine, the prescribed medication (often a bronchodilator or other respiratory medication)
- a clean nebulizer cup, tubing, and a mouthpiece or mask.
Wash Your Hands:
- Before touching the nebulizer equipment or medication, wash your hands thoroughly with soap and water.
Prepare the Medication:
- If the medication is in a liquid form, measure the prescribed amount according to your healthcare provider’s instructions and pour it into the nebulizer cup.
- If the medication is in a pre-filled unit dose vial, open it and pour it into the cup.
- Close the nebulizer cup securely.
Assemble the Nebulizer:
- Attach the tubing to the nebulizer cup and the other end to the compressor.
- Make sure all connections are secure.
Attach the Mask or Mouthpiece:
- Depending on your comfort and the age of the individual using the nebulizer, attach either the mask or the mouthpiece to the top of the nebulizer cup.
Plug In and Turn On:
- Plug the nebulizer into an electrical outlet and turn it on.
- You should see a mist being generated from the mask or mouthpiece.
Breathe In the Mist
- Sit in a comfortable, upright position.
- Breathe in and out normally through the mouth if using a mouthpiece, or place the mask securely over your nose and mouth.
- Breathe deeply and evenly to inhale the medication mist.
Complete the Treatment:
- Continue inhaling the medication mist until the nebulizer cup is empty or the mist stops coming out.
- This usually takes around 10-15 minutes. Keep taking slow, deep breaths.
Clean the Nebulizer:
- After the treatment is complete, disassemble the nebulizer and clean all its parts thoroughly according to the manufacturer’s instructions.
- Proper cleaning is essential to maintain the effectiveness of the nebulizer and prevent contamination.
Store the Nebulizer:
- Once cleaned, allow the parts to air dry and then reassemble the nebulizer.
- Store it in a clean, dry place.
Follow Medical Guidance:
- Always follow the instructions provided by your healthcare provider.
- If you have any questions about the treatment or the use of the nebulizer, consult your healthcare team for clarification.
- Using a nebulizer for cough or respiratory issues at home can provide relief,
- but it’s important to remember that this is not a substitute for medical advice.
- If the cough persists or worsens, or if you experience any difficulty breathing, seek medical attention promptly.

Types of Nebulizer
- There are several types of nebulizers available, each with its own design and mechanism for delivering medications as a fine mist for inhalation. Here are some common types of nebulizers:
Jet Nebulizer:
- Jet nebulizers, also known as “atomizer” nebulizers, use compressed air or oxygen to create a high-velocity stream of medication that breaks it down into a mist.
- These nebulizers are widely used and are suitable for a variety of medications.
Ultrasonic Nebulizer:
- Ultrasonic nebulizers use high-frequency vibrations to turn liquid medication into an aerosol mist.
- These nebulizers are generally quieter than jet nebulizers and can deliver medication more quickly.
- They are often used for specific medications and can be portable.
Mesh Nebulizer:
- Mesh nebulizers use a vibrating mesh or plate with very small holes to create a fine mist.
- The medication is drawn through the holes and turned into an aerosol.
- These nebulizers are efficient and portable, making them suitable for use outside the home.
Soft Mist Inhaler (SMI):
- Soft Mist Inhalers are advanced devices that produce a slow-moving, soft mist of medication.
- They are often used for medications that require precise dosing and are commonly used for managing conditions like asthma and COPD.
Compressor Nebulizer:
- Compressor nebulizers are a general category that includes jet nebulizers.
- They use compressed air to aerosolize the medication.
- These are commonly used for home treatments and are versatile in delivering a range of medications.
Vibrating Mesh Nebulizer:
- Vibrating mesh nebulizers use a mesh/membrane with numerous tiny holes that vibrate, creating aerosolized medication. These nebulizers are efficient and portable, making them suitable for on-the-go use.
Breath-Actuated Nebulizer:
- These nebulizers release medication when the patient inhales.
- They’re designed to synchronize medication delivery with the patient’s breath, ensuring efficient drug delivery.
Child-Friendly Nebulizers:
- Some nebulizers are specifically designed to make the process more appealing and comfortable for children.
- They might have colorful designs, play music, or have other features to distract and engage children during the treatment.
Battery-Operated Portable Nebulizers:
- These are compact and portable nebulizers that can be battery-operated or charged via USB.
- They allow patients to administer their medications even when they are away from home.
Conclusion
- When selecting a nebulizer, it’s essential to consider factors such as the type of medication you’ll be using, your healthcare provider’s recommendations, ease of use, portability, noise level, and maintenance requirements.
- Always follow your healthcare provider’s instructions and the manufacturer’s guidelines for using and maintaining your specific nebulizer model.